Posted: July 2nd, 2013 | Author: admin | Filed under: Uncategorized | No Comments »
When problems pop up with your Mac you may think of using Disk Utility to straighten them out. You’re not alone if that’s your first thought about Disk Utility, because many Mac users think that being able to resolve some of your Mac’s problems is all that Disk Utility can do. Well, that and using Disk Utility as a maintenance program.
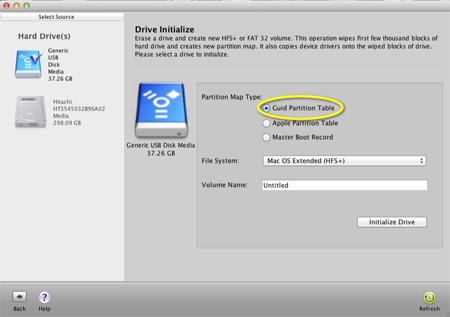
(Image 1)
Although it’s great for maintaining your Mac and does have great First Aid features, including fixing startup problems, and verifying and repairing disk errors, there are actually many lesser known talents that you can be using Disc Utility for. Like what you ask? Well, like partitioning or erasing a drive, mounting and unmounting volumes, creating a disk image and erasing a CD-RW or DVD-RW disc. How’s that for a start? Want to know more about using Disk Utility on your Mac? Great, follow me me to your Disk Utility so you can follow along!
Finder>Applications>Utilities>Disk Utility
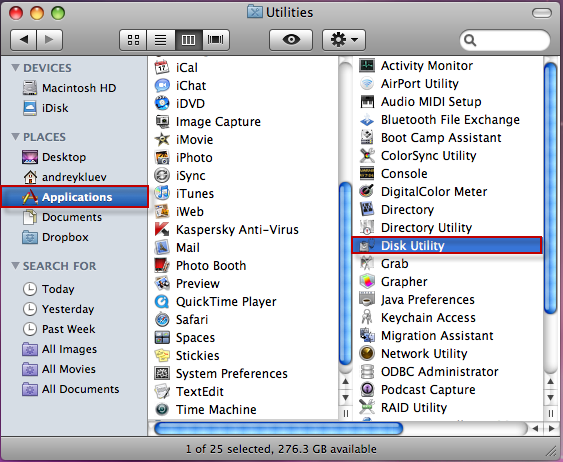
Use Disk Utility to Mount & Unmount Volumes
Using your Mac’s Disk Utility program for mounting and unmounting volumes (drives / disks) begins our list of its lesser known talents. Under normal circumstances, mounting and unmounting external drives is very easy. But occasionally, a drive will not mount correctly, or you will unmount a drive and not remember how to remount it.
(Image 2)
When you launch Disk Utility, you will see a list of all drives that are connected, but not mounted, listed on the left side of the window. To re-mount a drive, simply select it, and then click the ‘Mount’ button on the toolbar. If you want to eject, or unmount a drive, you can use Disk Utility to do that too. Remember though, that you must eject all of the drive’s partitions or none of them, you cannot pick and choose the partitions to eject.
Erase a DVD-RW or CD-RW Disc
(Image 3)
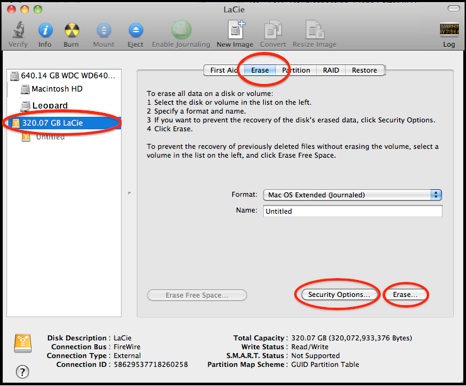
In our second way that you can be using Disk Utility for more than a fixer upper, you can try out the Erase tab. In the Erase area you can erase a drive, or if you are using DVD-RW or CD-RW discs as a backup or for storage, you may want to erase the data from it so that you can reuse it or again.
To erase a disc, select the disc from the same window on the left that shows the list of drives / disks. Once you have it selected you now use Disk Utility to erase it by choosing the Erase tab. Then choose if you want it to erase the information Quickly or Completely. It will give you instructions below to help you know which to pick. Lastly, you click on the Erase button and if you picked Quickly it will be done in just a few minutes. If you went with Completely it will take around an hour to completely complete the process.
(Image 4)
Erase a Drive Completely
As mentioned earlier, Erase can be used to erase a drive too, such as your hard drive. Why on earth would you want to use Disk Utility, or any other program, to erase everything from your Mac’s hard drive? There are a few reasons for needing to do this, the most common of them being that you are selling your Mac. Fortunately, Disk Utility can tackle this for you quickly, and easily. There are actually two different ways you can use Disk Utility to erase your hard drive.
(Image 5)
Way 1 to Erase a Hard Drive Using Disk Utility: Faster but Less Secure
The quickest way to use the Erase feature in Disk Utility to erase your hard drive is to select the Volume (drive), and then choose the Erase tab. While this makes the disk appear to be empty, the data is actually still there hidden. The only thing that is really gone is the catalog directory, which is what points to all of the files.
Once done, your Mac will consider the space to be free space, which means it will now take any new data and use it to overwrite the old data. This may make you think that your old data can still be found on your hard drive or that some of it could still be accessed, you would be right to think so. While it is not easy for the data that is left to be found or accessed, there are some programs, or individuals, that have the ability and skills to still get at your information. If this is not okay or good enough for you, it’s all good, just move on to way 2.
Way 2 to Erase a Hard Drive Using Disk Utility: Slower but More Secure
If you are not satisfied with the option of writing over the data that is already on the drive with new data, you can use a slower but more secure alternative. By erasing your hard drive with the steps I will give you below, all still using Disk Utility, you will completely remove all data so that no hacker or service can ever access it.
To completely erase your hard drive: launch Disk Utility and then click on the ‘Security Options’ button. You now get to choose just how secure this erase will be. Once that opens, you will have a few different erasing options such as 7 or 35-Pass Erase, and Zero Out Data. If you choose 7 or 35-Pass Erase, the drive is erased many times to ensure that every piece of data is completely removed, however, the more passes you choose, the longer this will take. Under normal circumstances, Zero Out Data, which is only one pass, should work perfectly well.
Partition a Drive
Partitioning a large hard drive is something that many people want to do. When you partition a drive, you are splitting the drive up into several smaller parts. Some reasons why people partition their drives include: booting into different operating systems, creating a backup drive, and for convenient and secure file sharing.
(Image 6)
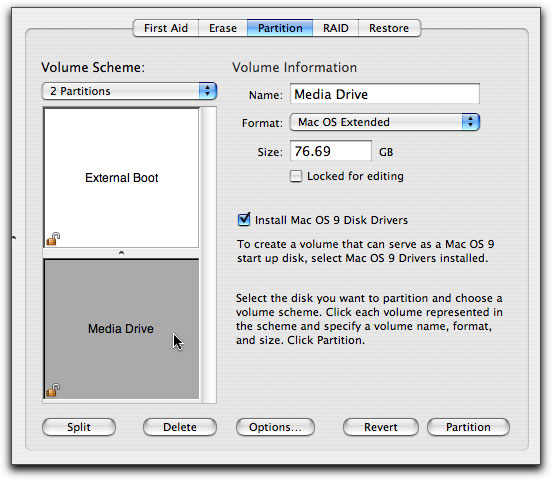
To partition a drive using Disk Utility, launch the application and then select the drive on the left side. Once the drive is selected, click on the Partition tab. If you are partitioning an external drive, you will then need to click on Options and choose the preferred option from the Volume Scheme menu. Then, select the number of partitions you want to make, the size of each, and give each one a unique name. Then simply click on the Partition button and Disk Utility will erase and reformat the drive.
Creating a Disk Image
Most downloadable software comes in the form of a disk image, and you can tell which ones do because they have the .dmg file extension. All you have to do to open the disk image is double click on it, and then all of the contents appear on your desktop.
You can also create your own disk images using Disk Utility. This will allow you to create a single, unique file that contains a duplicate of the contents of a folder. If you use Disk Utility’s default options, the file will even be compressed to save disk space.
(Image 7)
To create a disk image, launch Disk Utility and then choose File: New Disk Image or choose it from the top. Then simply navigate to the desired folder and click on Image. You will have to give the image a name, and then click on Save. You can also password protect your disk images by choosing AES-128 from the Encryption menu in the Save dialog box. (Image 8)
Posted: June 30th, 2013 | Author: admin | Filed under: Uncategorized | No Comments »
A Mac slowing down has happened to all of us Mac users at least once. You use your Mac daily and it is all good; you surf the net, you chat, and you play games just fine. Then one day, “whamâ€, your Mac starts popping up that spinning beach ball instead of moving along in its normally quick and snappy way. You don’t know what’s going on, but you do know that it’s frustrating you.
You don’t need to worry though. Fixing a slow Mac is something that can be very easy and it doesn’t even have to cost you much, if anything at all, because there are some free easy solutions right there on your Mac. And, if those don’t work, there are some really great, free or very inexpensive alternatives. See, nothing to worry about, because whether you decide to do it all yourself or take advantage of a program to do it all for you, you can speed up your Mac again in no time. Now, enough wasted time, let’s get started!
Tip 1: Do a Little Spring Cleaning on Your Mac
A few of the most basic tricks you can try first to speed up your Mac are cleaning the desktop, emptying the trash, and sprucing your Mac up a bit by trimming applications and widgets. These are all easy tricks you can use to fix a Mac that is running slow. Just think of it as you would cleaning your own home or office. Follow these steps to get your Mac running fast again:
- Clean Desktop: All the extra things on your computer’s desktop take up space and can slow your computer down by using virtual memory. Pick which things you need on your desktop and put the rest away in a folder.
- Empty Your Trash: Make sure to empty the trash bin. This creates more free space, because until it’s emptied all the files are technically still there taking up space.
- Spring Cleaning: Check your applications and software for unused or unwanted files. You may have forgotten about something that you no longer use but it is still taking up valuable space. It is best to use a program that helps you get rid of the file completely when removing apps and programs, so you may want to use MacKeeper or AppZap as they can do that for you.
- Extra Cleaning: Widgets are also a huge waste of your memory and hard drive space, so if you don’t use them or need them they are just taking up your Mac’s resources for no good reason. To get rid of them just go to your widgets and remove what ones you no longer want or use.
Tip 2: Language Packs
When you install or download files many times there are extra language packs that come along with them. You don’t need these and they do take up space on your Mac, a lot of space. This could potentially cause your Mac to run slower. You may be surprised to find all the many language packs you have. By deleting these space stealers, you can help keep your Mac from running slow. You can use programs like Monolingual, MacKeeper or MacCleaner to get rid of these extra languages. Monolingual is free and the other two apps have free trials that you can use to rid your Mac of these space hogs.
Tip 3: Checking Your RAM
One simple thing to do when you are wanting to fix a slow Mac is to check your RAM. If your memory is small this could be the cause of a slow running Mac. Adding to the RAM will change your slow Mac to a fast Mac in a hurry. Adding memory is one of the easiest ways to fix a Mac that is running slow, albeit one of the more expensive ways too. A bigger memory will speed your Mac up, but should be added as a last resort after you have tried everything else.
Tip 4: Empty Cache
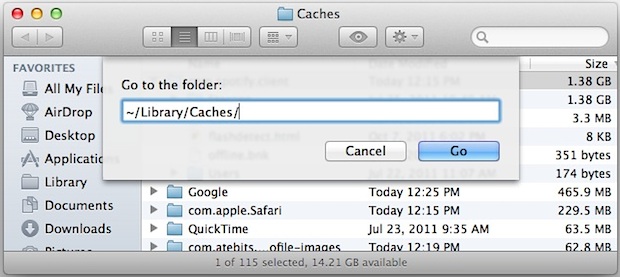
All those temporary files and your cache can bog your computer down, which then slows it down. If you are unsure of deleting or emptying this folder, you can create a backup until you know it worked. Follow these steps to empty your Cache on your Mac:
- Go to your ‘Library’ folder and open it to find your ‘Cache’ folder.
- To delete the Cache files, simply move the file to the trash and then empty the trash bin.
- Next, Restart your Mac to see if this solved the problem of your slow computer. If so, delete your backup folder.
Don’t forget about the cache on your browser. Find and delete this by choosing ‘Empty Cache’ or ‘Delete Browsing History’ from the menu of your browser. This will also free up space and help your Mac to run faster.
Tip 5: The Trick is, Not to Forget Disk Utility
You can run your Disk Utility, which come standard on your Mac, to fix a Mac that is running slow. Disc Utility is one of those little known or little remembered things that we have on our Macs that can fix many issues. Follow these steps to use Disk Utility:
- Open the program and choose Repair Disk Permissions. You can also choose to Verify Disk Permissions but it is not necessary unless you want to see the problem before fixing it.
- Now, click on Repair. If the permissions from web sites are changed or moved on your computer, it can slow it down. Repairing the permissions will solve this problem.
Tip 6: Use a Program
You can go through your Mac and delete everything that may be causing it to run slow. This may take quite a long time and be tedious, so there is a quicker and easier alternative which is by using a program to do all of these things for you. Several programs will find, delete, and fix things that are causing your Mac to run slow. They are much quicker, and often much easier and sometimes safer, than doing it manually.

Programs that help fix a slow Mac:
1. Monolingual
This program will only get rid of the language packs on your Mac. It does make it easier than looking for each one manually. Monolingual is free and it will clean your Mac of hundreds of megabytes, perhaps even gigabytes of unwanted language packs. Make sure you do not delete or remove the English or English United States languages.
2. MacKeeper
This program will clean all the areas of your Mac for you. It is quick and easy to use. You can run the program whenever you like or you can schedule it to run at specific times and not worry about it. MacKeeper cleans caches, files, language packs, and junk files for you. You can save time using the program, but also you can benefit from it in other ways as it includes an antivirus program, a program to help you keep backups and one to help you find your Mac should someone steal it.
3. Clean My Mac
Another program that will clean up your Mac is Clean My Mac. The program finds and gets rid of unnecessary files to free up space. It will get rid of apps and extensions you do not need. It has an easy interface to help you quickly clean fix a Mac that runs slow. The program is similar to MacKeeper and also checks and cleans logs, caches, files, and much more.
Slow Mac Fixed?
With all the easy tips and tricks available to you, there is no reason for not fixing a slow Mac yourself. Even if the fix was to upgrade your RAM it is something you can also do yourself by following the easy directions that comes with the new RAM or finding the directions on the Apple Support site. As for the other ways to fix your slow Mac, whether you do it all manually or with a program, getting rid of the clutter that slows your Mac down is not only good to do when your Mac is slow, it is also a good idea to do it regularly. The more free space you have the faster your Mac, and you, will run.
Posted: June 28th, 2013 | Author: admin | Filed under: Uncategorized | No Comments »
Have you noticed that your Mac computer is freezing randomly, during startup, after you login or after it comes out of sleep mode? If so, you may also have noticed that your temperature rises every time your Mac freezes. Okay, just kidding, well sort of, since there are few things more frustrating then when your computer decides it doesn’t want to respond. Mac’s random freezes are certainly no fun.
Really though, what else you probably notice when it’s freezing up is that it’s generally slower than it used to be, the hard drive may be noisier, and you’re spending more time watching the spinning beach ball while you wait for applications or documents to load. If you have noticed any of these things, don’t worry, it’s quite common and fairly easy to fix.
Why Does My Mac Freeze?
There are many reasons why your Mac computer experiences random freezes, however the most common are:
- Too many applications are running at the same time.
- Too many programs or applications are trying to access the hard disk at the same time.
- Your Mac is low on memory.
- You have too many duplicate files on your system, causing it to become sluggish.
If your Mac is fairly new, and you don’t have many applications running, then it is unlikely that you will be low on resources. This means that the problem is likely to be the last one, duplicate files. To help stop your Mac from freezing, make sure that you clean your duplicate files and unnecessary junk files on a regular basis. There are many Mac cleaning tools available, such as MacKeeper or a free Mac cleaner called Magican, that can help you do this.
Force Quit – A Short Term Solution for a Frozen Mac
If your Mac freezes and you cannot get anything to work, you can often use Force Quit to un-freeze it. To do this press the Command, Option, and Escape keys simultaneously.
This will bring up the Force Quit window, which will show you the main programs that are running. You can click on an individual program and choose Force Quit to shut it down. Once the offending program has shut down and your Mac has un-frozen, restart the entire machine so that you have a clean start.
Remember however, that Force Quit does not fix the problem, it merely brings your Mac back to a working state.
Cleaning & Optimizing – A Long Term Solution for a Frozen Mac
If your Mac freezes on a regular basis, or you have noticed that you are using a lot of disk space or RAM, it is time to optimize and clean your system. Every time you install, or uninstall applications and programs on your Mac, some files are left over and they take up unnecessary disk space. As the disk gets fuller, your entire system will slow down and could begin to freeze up more often.
To help keep your Mac clean, it is a good idea to set up a maintenance schedule where you uninstall unused programs, search for and remove duplicate files, and go through your Widgets. As mentioned earlier, there are many Mac cleaning programs available that can help you take care of these cleanup and optimization chores.
Some of the programs will also allow you to schedule the cleaning, but even if you don’t schedule a clean up, it’s easy enough to just click on the program and run the scan and the fix afterwards. And, because you have a program to do it you will notice the apps icon which will remind you to do the cleaning, unlike when you do now which is waiting till it starts showing a problem, like freezing up, before giving it a scrub.
More Tips for a Mac That Experiences Random Freezes
If you do not want to use a Mac cleaning application, there are a few things you can do yourself to help stop your Mac from giving you the cold shoulder.
- Stop unnecessary programs from running at startup. To do this, click on the Apple menu and then System Preferences. Then click on Users & Groups, and then the Login Items button. This will bring up a list of all applications that run as soon as your Mac starts up. To remove any applications that you don’t need every time you start up your Mac, select them, and then click the minus sign (-) at the bottom left of the list.
- Remove desktop files. Every time your Mac boots it has to index, create the icon, and catalog the contents of every folder that sits on your desktop. Wherever possible, remove these folders, to help stop slow boot times and freezes. At the very least, make sure to take any individual items you have put on your desktop and put them into a file. Label the file ‘Desktop’ and then inside the file you can make subfiles, like ‘desktop programs’ or ‘pictures’.
- Clear your cache, remove log files, unused applications, and duplicate files. All of these things are simply junk files that take up extra space on your hard disk. This can slow your Mac down considerably and cause both freezes and system crashes. The easiest and fastest way to clean these up is to use a Mac cleaner, but you can do it yourself if you’re familiar with your Mac’s Terminal.

Still Getting The “Cold Shoulder†from Your Mac?
A Mac that freezes up while trying to use some of it’s apps or while searching the internet can be extremely frustrating. Most of the time, however, it’s not caused by a serious problem, so there is usually no need to replace your computer or send it to a repair shop for costly maintenance. If you spend a little time and effort making sure that your Mac is kept maintained and clean of junk files, you shouldn’t have to deal with a slow computer or one that freezes or crashes on a regular or random basis.
If it does continue though and it becomes a not so random but constant thing, you should consider adding more RAM to your Mac. It is not very expensive to add more memory and it’s also an easy do-it-yourself type job. If you were to add 4GB of memory it would cost you around $45, depending on the brand and type. Then get yourself a little tool kit, about $12 and don’t forget the anti-static wrist band for about $5-$10.
So if you were to add 4 more GB to your Mac it would cost you less than $70 to get it running lightning fast again. If you do end up using this final solution, you should definitely not be experiencing any more frozen up apps, at least until you need more memory that is! To prevent that from happening anytime soon though, just keep this article with you and run through it to recall what it is you should be cleaning up so that you can keep your Mac as its “cool†self, just not so cool that it’s frozen.
Do you have tips for a Mac that is driving you crazy and locking you up while you’re trying to work or play? What do you do to fix it? We love to hear from our readers so please share some comments below.
Posted: June 26th, 2013 | Author: admin | Filed under: Uncategorized | No Comments »
Over time you may notice that your Mac computer isn’t booting as quickly as it once did. While this is quite normal, it can become very frustrating to have to sit and wait for your Mac to finish booting. However, you don’t have to remain frustrated as there are many different things you can do to help speed up your Mac’s boot time. Better yet, if you use these tips below you can speed it up without having to pay for expensive upgrades or purchase a new computer. So, let’s get going and get your Mac back on track to a speedy boot up!
Tip 1- Clear Your Desktop
Believe it or not, the desktop plays a huge role in how long it takes for your Mac to boot up. This is because it is always the first screen to load, so if it is loaded with shortcuts and icons, it can use a lot of your Mac’s memory and cause a much longer boot time. Wherever possible, you should try to reduce the amount of icons from the doc, and clean up any files that you see on your desktop.
You can either delete these files or put them into convenient folders to help increase boot time. To make a folder on your desktop, just right click and select ‘New Folder.’ Then drag the files and drop them into your new folder. You can make as many folders as you need or just create one labeled ‘Desktop Files’ and then create subfolders to organize the contents.
Tip 2 – Manage Your Startup Items
With many new apps you will find that they are setup to automatically configure your Mac’s startup settings to allow it to load every time your Mac boots up. During installation, some programs ask you if you want this to happen, but there are many that just do it without your knowledge. This means that the app will load every time your Mac boots, regardless of whether you actually use the application or not. By allowing this to happen you are making your Mac’s boot time longer.
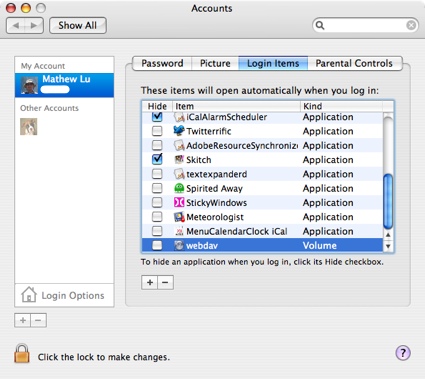
To fix this you should remove the applications you know that you do not need to use every time you use your Mac. You can do this by removing them from your startup list. To do this go to System Preferences – System – Users & Groups (in older Mac OS X go to Accounts)- Login Items, and then (in Lion OS X) uncheck everything that you do not want to start on boot up, or (for other OS X) click on the app to highlight it and then click the minus button to delete it.
Tip 3 – Use Automatic Login
With Mac OS X, the default is to show the login screen every time the Mac boots up. If there is more than one user, this can be useful. However, it can slow down your Mac boot up time and it is another step that your computer has to go through. If you are the only user, or everyone uses the same account, you can skip the login screen and login automatically. To do this, open System Preferences and go to Users & Groups or Accounts (depending on your OS X version), and click on Login Options. Next you choose the user account that you want to automatically login to from the drop down box.
Tip 4 – Clean Your Hard Drive
All Mac operating systems use any free space on your hard drive as virtual memory, and this virtual memory plays a part in how well your computer performs. Because of this, the more data you have on your hard drive, the less virtual memory becomes available. Therefore, in order to help increase your Mac boot time, and keep your computer running smoothly, periodically cleaning your hard drive is necessary. To clean it up you want to get rid of any old or unnecessary files. You can do this manually by removing unused applications, emptying your trash etc., Or you can purchase one of the many Mac utility programs, like MacKeeper or MacCleaner, that can help you keep your computer clean and running optimally.
Tip 5 – Reset Your PRAM
To do this shut down your Mac and wait for about 30 seconds before turning it back on. When you turn it on, hold down the Control – Option – P and R keys as soon as you push the power button. Instead of booting up, your Mac’s screen will light up and you will hear the Mac chime, as soon as you hear this, press the same keys again. Complete this cycle three times, and then release the keys and allow the Mac to boot up.
Tip 6 – Turn Off Window & App Restore
To disable this feature if you have it, open up System Preferences and then click on General. In this window, uncheck the box that says ‘Restore windows when quitting and re-opening apps’.
*Note: If you are not using OS X Lion, you will not have this feature available.
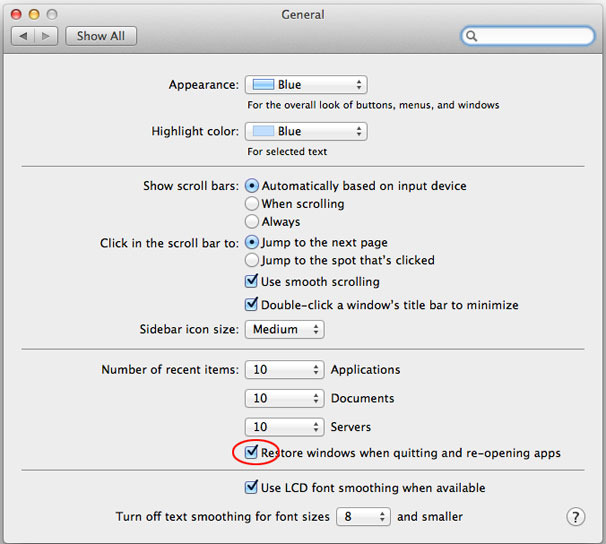
Tip 7 – Disconnect External Devices and Drives
If you have an external device or hard drive, they have to be turned on every time your Mac boots up. Because some peripherals are slow, this can decrease your Mac boot time. The best solution for this is to disconnect any peripherals, and eject any discs from the mac that aren’t needed on a regular basis. This can actually save a good 10-15 seconds of boot time in some cases.
Tip 8 – Upgrade to an SSD Hard Drive
While this may not be practical for everybody, an SSD (solid state drive) hard drive will increase Mac boot time and system performance. The price of SSD hard drives is beginning to come down, and they are a fantastic speed boost for any computer.
Tip 9 – Use Sleep Mode
To avoid restarting your Mac, and the slow boot times that come with it, you can use sleep mode. To do this simply close the lid of your Macbook, or press the power button to enter sleep mode instead of shutting down. When you are ready to use your computer again, it will be in exactly the same state as you left it.
Tip 10 – Upgrade Your RAM
One of the most inexpensive ways to boost your Mac’s boot up time, and overall performance is to add more memory. Mac memory can usually be found online for around $50 or less. Just ensure that you purchase the right amount, speed, and type of memory for your particular computer.
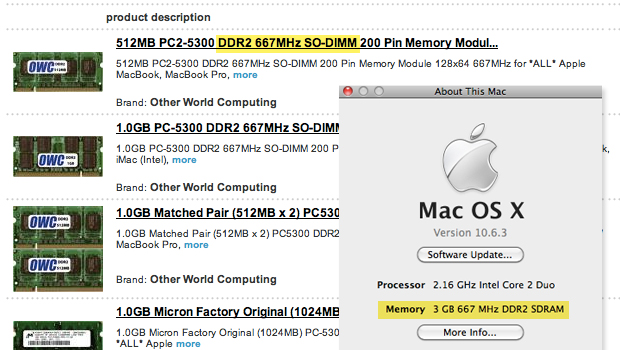
How’s Your Boot Up Now?
So, have you done some of these tips I gave you? How’d they work? You won’t know until you reboot your Mac so if you haven’t done so yet, go ahead, I’ll wait. Once you’re done, let me know if any of these made a difference for you. These 10 tips won’t just speed up your Mac’s boot time though, they will also increase its overall performance. While some of these tips involved upgrading hardware, many are simple fixes that take nothing but a little time.
Due to these fixes being easy, it should also be easy for you to incorporate them into a regular maintenance routine for your Mac. At the very least, you should regularly (at least once a month) clean up your desktop, go through your apps, and keep an eye on your login / startup items. And, even if you do end up adding memory to your Mac, don’t allow that to make you lazy. You should still perform all, or at least most, of the tips above if you want to keep your Mac booting up fast and keep it running at its best. That’s it, but before you go, remember to let me know which tip you used to speed up your Mac’s boot time!
Posted: June 24th, 2013 | Author: admin | Filed under: Uncategorized | No Comments »
Have you noticed your Mac getting slower lately? Is it freezing up sometimes, perhaps having trouble multitasking the way it used to? This can be due to certain apps on your Mac. Some of the most popular apps that can slow your Mac down include graphic intensive apps, and clunky, bloated apps.
(Image 1)
By identifying which apps use the most of your Mac’s resources, which can then slow it down, you can then decide if you really need the app, or know which ones you should at least be sure that you have quit or shut down completely after using it. Below, we are going to list some of the most popular apps that can really slow down your Mac computer.
iTunes
iTunes is an application that was created to manage a music collection. But today it manages much more than that, in fact, iTunes manages music, TV programs, e-books, iOS apps, backups, iTunes U courses, and movies. It also manages PDF files, ringtones, and Ping accounts. That’s a lot of stuff!
While the iTunes app is obviously a fantastic resource and a must have for almost every Mac user, it is also very clunky, bloated, and not extremely user friendly. Another bad mark for iTunes is that it often creates duplicate files that end up popping up on your hard drive and taking up valuable space. Don’t worry though, you don’t have to completely get rid of it to make your Mac faster, just remember to quit it when you are done with it. Don’t just click on the X, right click and choose Quit.
(image 2)
Adobe Photoshop
Adobe Photoshop is a fantastic program for editing photographs and other design work. Unfortunately it is also a clunky, slow, resource hog that many Mac users feel to be unstable and unattractive. Many also feel that it doesn’t integrate well with OS X, and are hoping for a new, more friendly version to be released in the future. While you wait though you should also be sure to quit it when done.
You can also help save your Mac’s resources by keeping your photo’s on a cloud app, like DropBox. Whenever you use any photo editor it will use up a lot of your Mac’s resources and slow it down so be sure again to quit it completely when you finish. You could also use an online photo editor like Picasa, which will help by not actually having to use it on your Mac and therefore, not have to use its resources.
(image 3)
The Tube
A competitor for EyeTV, that according to many users does a very poor job, is called The Tube. Complaints say that The Tube is a badly designed application that claims to allow you to watch and record TV using a USB TV receiver, and then play it back on your Mac computer or iPhone.
Unfortunately, The Tube has received many complaints saying that it is extremely resource heavy and causes many Mac computers to slow down considerably and even crash. The Tube also has other issues and often cannot recognize the TubeStick, which is needed in order for the application to work correctly. This is one you can delete and instead use a better one, like EyeTV.
Adobe Photoshop Elements 10

While this is one of the most popular Mac applications available, and is listed as being in the top 10 bestsellers from the App store. Adobe Photoshop Elements 10 can be a bit of a resource hog and can slow down your Mac computer if you use it alongside a few other apps.
If you use Adobe Photoshop Elements 10 and notice a slowdown in performance, use the resource monitor to see what other apps are running that you can turn off temporarily. Remember also that you can use an online storage service for the photos to save some space and memory.
AutoCad
AutoCad is 2D and 3D CAD design software that allows you to design engineering and architectural projects on your Mac computer. It is a great program that allows you to design and create your ideas. However, because of its many features and functions, it can be extremely resource heavy and can slow down your Mac computer, especially when working in 3D mode.
How do You Know Which Apps are Slowing Down Your Mac?
While most of these applications are extremely popular and great to use, they can slow down your Mac computer system, which can take away a lot of their benefit. There are more apps that can take up your Mac’s hard drive space and memory too, but how do you know which ones are the worst?
One way to know that an app is slowing down your Mac is if it seems to make a difference in your Mac’s speed or responses when you’re running it. You can find out for sure though on any app by going to Activity Monitor to see just how much memory it’s using. To do this, go to: (image 4)
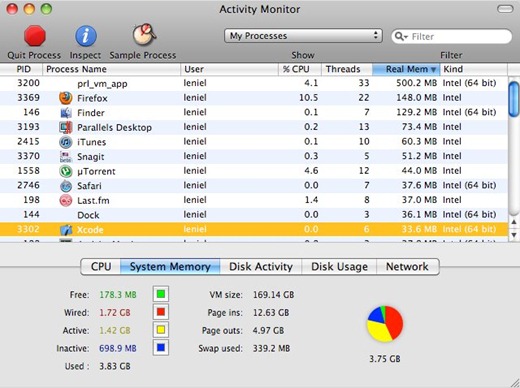
Finder>Applications>Utilities. Once there, click on the System Memory tab.
This will bring up a list of everything that is running on your Mac computer and show you how much memory each application is using. Of course, there will be some applications that you have to leave running, but there will be many that you can temporarily shut down. Shutting down some applications will allow you to use the resource heavy programs that you want to use, and not slow your system down too much.
(Image 5)
Alternatively, you can search the Internet, and the App Store for less resource heavy alternatives to those popular programs that can slow down your Mac. But some, like Photoshop, AutoCad, and Photoshop Elements 10 are extremely hard to replace. That is why it is often a better idea to simply close down as many other running applications as possible so that you can continue to use the applications that you know and love.
(Image 6)
Once you have identified that an app is slowing down your Mac you should not just close it by clicking on the X in the corner, but actually Quit it. You can do that by going to the file or app name at top and clicking on it and then click on Quit, or right click on the dock icon to find it. You can also Quit a program while you are in Activity Monitor by clicking on the app you wish to close and then clicking on the red Quit button at the top.
Posted: June 22nd, 2013 | Author: admin | Filed under: Uncategorized | No Comments »
We’ve all been there. There is the one day you are sitting at your Mac and you’ve noticed that your Mac has been running a bit slow lately and you can’t think of what could be causing the problem. You may have been noticing a few things before it became frustratingly slow, such as your pages were loading slower, and apps that were not responding at all. When these things start happening regularly your first instinct may be to panic, but you don’t have too. Your Mac is just letting you know that you need to perform Mac maintenance. I’m sure you’re wondering though, just what is Mac maintenance?
One good way to think of Mac maintenance is to think about car maintenance, because in a way, your Mac is like your car. So just like you need to do some regular maintenance on your car, like oil changes, new spark plugs etc., to keep it running smooth and keep it running at its best, you also need to perform some basic Mac maintenance to keep your Mac running smooth and fast. Don’t worry, maintaining your Mac isn’t hard. With the 5 tasks below it’s even easier than doing an oil change and much less dirty. If you can perform these Mac maintenance tasks regularly, your Mac will stay running smooth and fast for as long as you need it to.
Task 1: Maintain Your Mac by Backing Up Your Files

It does not matter how you backup your files as long as you do backup your files and other important data. You can use an external hard drive and clone the entire system so you have it as back up, use Time Machine which comes with your Mac, or you can even easier you can do it by using the cloud. There are multiple online backup storage apps available, such as Carbonite and Mozy Home, but you can take advantage of the cloud even easier with your Mac because Apple has iCloud built right into it, making backup a breeze. Any of these programs allow you store data online keeping it safe and accessible for when you need it.
Task 2: Software Updates are a Must for a Smooth Running Mac
Software updates are great because they fix any bugs a program had and they correct any security issues with the software. Keeping your software updated means you have the latest fixes available. If you are unsure of what software needs to be updated you can use System Preferences to make sure you have the latest updates. You should check for updates regularly if you want your apps and Mac to keep running well.
If you are busy and feel you may forget this part of your Mac’s maintenance, you can check your software using third party updates software which can do it automatically, such as MacKeeper or Magican, or go to the MacUpdate site for their latest list. At MacUpdates, they list recent updates for you, and if you pay for a subscription they will send you notifications of updates.
Task 3: Put Your Mac on a Diet Free Up Hard Drive Space to Makes Your Mac Happy
When your Mac gets too much on its hard drive it becomes slower. Just like us when we gain too much weight, an over full Mac becomes sluggish. It has too much to store and not enough space, but it also room to store it all. Therefore, you should include cleaning up your Mac’s hard drive when you perform maintenance on your Mac. To do this you just go through your files and apps and get rid of those that you no longer need or no longer use drive.
If you are not sure of how much you have on your Mac you can just check it out in your your Activity Monitor. There are other ways to check out how much space is being used but I like Activity Monitor because you can also see what programs are currently using up the most of your Mac’s resources. Once in there you can click to check your hard drive. Ideally you want to have about 10% free space on your hard drive. If you want to free things up you can run your Disk Utility, or just start getting rid of the space suckers. Face it, if you have not used a program or file in months, is it really needed?
4. Keep it Clean and it Will Show You Some Love Back
One very basic yet important part of maintenance for your Mac is to keep it clean. Not only your desktop internally, but also the computer exterior and keyboard need to be cleaned regularly. You can use a slightly damp cloth to clean the exterior, and compressed air to spray inside the vents and keyboard. This will get rid of dust and debris, like pet hair, that has collected and can cause problems if left alone.
For inside Mac maintenance, you want a nice, neat looking desktop. Keep only what you need there because everything you store on the desktop is treated as a separate window by your Mac, and this separate windows use your Mac’s memory. The desktop is not the only place you need to clean and tidy up.
5. Last Tip for Maintaining Your Mac: Laptop Battery Calibration
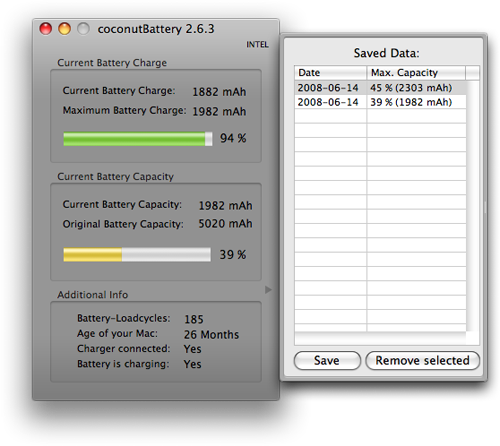
If you have a Mac laptop, you should calibrate the battery once a month. This is something that is recommended by Apple. You can avoid shorter than expected battery life by calibrating the battery. There are tiny processors that monitor the battery charge and usage, these tell your OS X how much estimated time is left. The estimates can become less than accurate over time. When you calibrate the battery, it will get the microprocessor and battery back in sync.
All you need to do to make sure your Mac’s battery is maintained as part of your routine Mac maintenance, is to use your battery until it has run down completely. Then you just charge it back to full power. There are also more specific instructions to calibrate the battery for each device that are according to the different Mac model batteries.
How to Make Your Routine Mac Maintenance Even Easier
As we wrap this up, you may be thinking that there are a lot of tasks when it comes to performing Mac maintenance. Although it’s really not that bad, it is true that for those of us that are very busy and using our Mac’s as part of our everyday life, then you may want an easier way to keep your Mac happy and you happy with your Mac.
For this, there are some free programs like Onyx or Magican that will make your Mac maintenance easier to do. These programs do it all for you with just a few clicks to select your settings. Many Mac cleaners can also be setup to regularly do the maintenance tasks you choose. Other Mac cleaners that work well but cost you a bit of money are CleanMyMac and MacKeeper. Whichever one you choose, or even if you choose to do it manually, just be sure you do it. Keeping your Mac running at its best is the outcome you want, so how you get there doesn’t matter.
Posted: June 20th, 2013 | Author: admin | Filed under: Uncategorized | No Comments »
There may come a time when your Mac computer has problems booting and requires you to use Mac safe boot to boot into safe mode. This may happen because it has stopped responding during the boot process, it’s displaying an error message, or you see a grey or blue screen with or without the Apple logo (often called ‘the screen of death’), a spinning globe or gear, a folder with a flashing question mark, or a prohibitory sign. No matter what the reason is for your needing to safely boot up your Mac, your objective is to get into your Mac’s safe mode, something which is sometimes referred to as Mac safe boot.
What is Mac Safe Boot or Mac Safe Mode?
Let’s start off with just what safe boot is, because once you understand something it’s a lot easier to figure out how and why you are to use it. So, what is Mac safe boot and Mac safe mode? Well, to start with, the words ‘safe mode’ and ‘safe boot’ are actually not just in reference to a Mac, they’re used also with Windows OS.
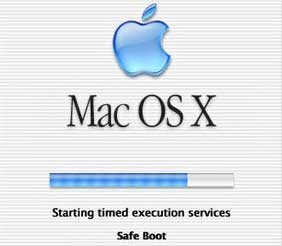
As to what they mean, safe mode is what your Mac or other OS boots into when you perform a safe boot. And safe boot is just when you boot into safe mode, so it is sometimes referred to by others as a Mac ‘safe boot.’ Either way it just means that you are booting into a safer mode of your Mac or whatever operating system you are using, so that you can safely fix whatever problems are occurring inside.
How to Use Mac Safe Boot / Safe Mode
It is quite easy to boot up safely with your Mac. To start up into safe mode do this:
- Make sure that your Mac is turned off.
- Press the power button.
- As soon as you hear the startup tone, hold down the shift key. It is very important to hold the shift key as soon as you can after hearing the startup tone, but not before you hear it.
- Let go of the shift key when you see the grey Apple icon and the progress indicator.
Notes for safe boot / safe mode in other OS X:
In Mac OS X 10.4 – 10.6.8
If safe boot is successful, you will see ‘Safe Boot’ on the login window.
In Mac OS X 10.2 – 10.3.9
If safe boot is successful, you will see ‘Safe Boot’ on the Mac OS X startup screen.
How to Use Mac Safe Boot When You Cannot Use The Keyboard
There may be a time when you need to use safe boot to get into safe mode, but you can’t use the keyboard to do it. If your keyboard isn’t functioning properly, or at all, then you may feel panicked because you can’t use your keyboard to get into safe mode on your Mac, but don’t worry, if you have set up remote access to your Mac these steps below will get you get you back in. If you haven’t set up remote access to your Mac, well, you may be right to worry a little, but we’ll talk about that later (if you didn’t setup remote access, you should just go ahead and skip to the final heading).
If you already have remote access to the computer, you can easily configure it to startup in safe mode using the command line, to do this:
- Access the command line by opening Terminal remotely, or by logging into the computer from another computer using SSH.
- Execute this command on the command line, or in Terminal: sudo nvram boot-args=â€-x†*If you want to start using Verbose mode as well as safe mode, use the command sudo nvram boot-args=â€-x -vâ€
- When you are finished using safe mode, use this command to return to normal startup: sudo nvram boot-args=â€
When you are finished using safe mode, simply restart the computer normally and allow it to boot up as it usually does. If you couldn’t get in due to your keyboard not working and not having remote access, you can skip to the last heading to find some support help. Once in you should also follow the advice in the last paragraph on how to setup remote access to your Mac so this won’t happen again.
What Can You Do or Not Do Once You’re in Mac’s Safe Mode?
After you safely boot your Mac into safe mode you will be able to work on whatever is giving you a problem, for the most part anyway. Some devices will not be available in safe mode, so while safe mode is invaluable for troubleshooting problems, there are many Mac OS X features that will not work while you are in it. Some of the things you will not be able to do while in safe mode include: use the DVD player, use audio input or output devices, capture video with iMovie, or use an external USB modem. On some OS X your networking devices may not work either.
Below is a list of things that are affected while using safe boot to start in safe mode. In all Mac operating systems it will do the following:
- It only allows essential kernel extensions to load in /System/Library/Extensions.
- It forces the computer to run a directory check of the startup volume, which may cause the computer to take a little longer booting.
Other things that will be affected or that it will do while in safe mode according to your OS X:
Mac OS X 10.3.6 or Later
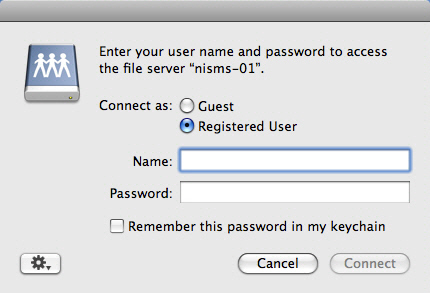
- Safe mode will disable access to File Sharing. Meaning that you will not be able to use Time Capsule disks or volumes being served by other computers running Mac OS X.
- It will only run Apple installed startup items.
- It disables all fonts other than those in the /System/Library/Fonts folder.
- It moves most font caches to the trash.
- It disables all login and startup items.
- It deletes the dynamic loader shared cache folder.*
- Safe mode will disable Quartz Extreme, this means that any applications that use Quartz Extreme will not work.
- Also, the Mac OS X menu bar will appear solid.
In Mac OS X 10.3.9 or Earlier
In Mac OS X 10.4 or Later
In Mac OS X 10.5.6 or Later
*This is because a cache with problems can cause a blue screen on startup, especially after a software update.
Final Safe Boot Tips and How to Setup Remote Access
Hopefully you have been able to figure out from our steps above how to use Mac safe boot to get you into safe mode. If for some reason you cannot get into safe mode on your Mac you will need to contact Apple Support or take it to an Apple repair shop. If you did get in you and you were able to fix whatever issues you were having with your Mac, then you may want to take the precaution now to set up remote access in case you do end up one day not being able to use your keyboard to safely boot up your Mac.
To setup remote access to your Mac, go to System Preferences, and then click on Sharing. Next put a checkmark in the box next to Remote Login. It will then say: “To log in to this computer remotely, type “ssh [email protected]”. Of course the ‘smithjohn’ name will be replaced with your name and your ip address will be used instead of the dummy one I made up. Write this information down so you have it somewhere safe for when you need it. You can also select Remote Management and then Computer Settings to set up remote access to your Mac even further.
That’s it, you are either in safe mode or you’re not. If not, then I hope next time you can get in that you will setup your remote access so this won’t be a problem again. If you have a tip for how to use safe boot / safe mode on your Mac, we’d be happy to hear it, so share it with us in our comments below.
Posted: June 18th, 2013 | Author: admin | Filed under: Uncategorized | No Comments »
Want to start fresh with your Mac? Decided to start over from scratch or just need to erase everything before selling it or giving it away? Whatever the reason is for wanting or needing to format your Mac’s hard drive you have to consider a few things first, because exactly how to format a hard drive on a Mac will depend on a few things, such as what type of hard drive you are formatting. This is because, the steps for formatting an internal drive will be different from those you would use to format an external drive.
Questions to know before you format Mac’s hard drive:
- Are you formatting an internal or external hard drive?
- If it is an internal drive, is it partitioned or do you plan on formatting the entire drive?
- Other things you should consider before formatting any drive is what the drive is going to be used for. For example, if it is an external drive, are you planning on using it only on Mac computers, or would you like to be able to use it on Windows PC’s as well?
- Because each operating system has its own format, you need to know the best format to choose. FAT 32 is compatible with both Mac’s and Windows based PCs. HFS+ is the normal Mac file system, and NTFS is the normal file system for Windows. Mac computers can read NTFS formatted drives, but they cannot write to them.
Before Formatting Your Mac’s Hard Drive
Once you have some information in mind from the questions above and you’re ready to format a Mac hard drive, internal or external, you should make sure that all of your data is backed up. When formatting an external drive, everything on that drive will be deleted and you will not be able to recover it. When formatting an internal drive, you will be returning it to the factory state, which means that all of your personal data and information will be deleted.
Now you can move on to the next step. Choose the steps for your needs, which will be either formatting an internal hard drive on a Mac or formatting an external hard drive on a Mac.
Formatting an Internal Hard Drive on Mac
When you format an internal hard drive on your Mac, you are giving it a completely fresh start. The drive will look, and act the same as it did when you first purchased the computer. Many people use formatting as a way to clean their personal information from a drive before donating or selling it, or to clean a system after a virus or other form of malware.
To format your internal drive you will need the Mac OS X installation disc that came with your computer when you first purchased it. Once you have the disk ready:
- Insert the OS X installation disc and restart your computer. Hold down the C key while the Mac reboots so that it boots directly from the disc.
- Double click on the ‘Install Mac OS X’ icon.
- You will be given an opportunity to click on an ‘Options’ button which will allow you to save existing files. You will also see an option to ‘Archive and Install’ and another option to ‘Preserve Users and Network Settings’. The last option you will see is to ‘Erase and Install’, if you are sure that you want to erase everything, select this option.
- From here on, the install disk itself will do the majority of the work and guide you through the rest of the process.
Formatting an Internal Hard Drive Partition or an External Hard Drive
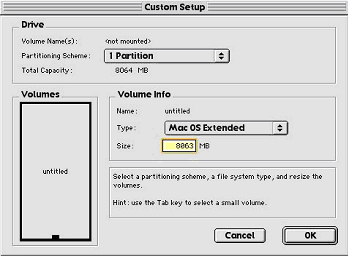
- If you are formatting an external hard drive, ensure that it is plugged in, and recognized by your Mac before you begin. If you are formatting an internal hard drive partition, ensure that the drive is partitioned and you know which partition you want to format.
- Open ‘Finder’ either by using the icon in the dock or through Spotlight.
- Click on ‘Applications’ in the list on the left.
- Scroll down the list on the right until you find a folder called ‘Utilities’, double click on this folder.
- Once the folder opens, you will see an application called ‘Disk Utility’, double click on it.
- In Disk Utility, find the hard drive that you want to format and highlight it. If it is an external drive, it will appear in the left navigation bar. If it is an internal drive partition, it should also appear in the left navigation bar, listed under the name that you gave it when you partitioned the drive.
- On the right side, you will see a tab that says ‘Erase’, click on it to erase the data on the drive.
- Underneath the Erase tab, you will see a ‘Format’ option. It is here that you will see a drop down menu where you can choose what file system you want to use. If you are planning on using the drive with both Mac and Windows based computers, choose MS-DOS (FAT). If you are only going to use the drive with Mac computers, choose Mac OS Extended (Journaled).
After you have chosen the file format you want to use, press the ‘Erase’ button to begin the formatting process.
Posted: June 16th, 2013 | Author: admin | Filed under: Uncategorized | No Comments »
Nervous about your Internet activity? Have something you don’t want others to see if they use your Mac? There’s ways to get rid of that so no one ever has to know, but even if you’re not concerned about your privacy, cleaning up your Internet history on your Mac is a good idea. It will help save disk space, which helps your Mac run better, and it’s also better for your security in-general since a record of everywhere you’ve been online is stored there permanently.
All internet browsers keep some kind of record of where you have been on the internet. Due to so many different browsers available to use for your Mac, there are different steps you will need to do to clean your internet history depending on which browser you use. In this article, we are going to cover cleaning your internet history in the most popular browsers used on Mac computers.
Safari
The browser that Mac’s come pre-installed with is Safari, just as Windows comes pre-installed with Internet Explorer. So if you haven’t changed your browser since getting your Mac, this should be the one you have.
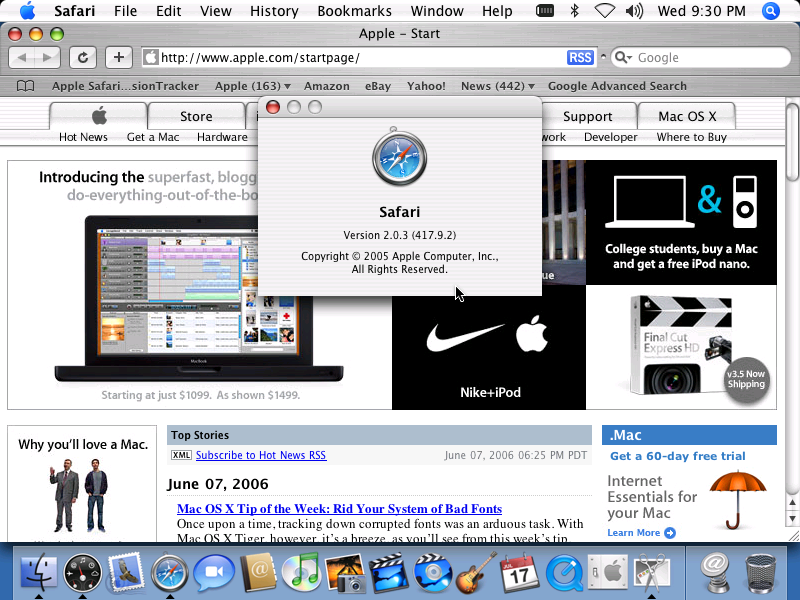
Cleaning your internet history in Safari is extremely simple. All you need to do is click on the History menu at the top in the toolbar, and then click on Clear History. A small box will appear asking if you really want to delete your history, simply confirm and your history is gone. While you are deleting your history, you can also reset your Top Sites. If you would like to do that, click on the appropriate check box, and then click Clear.
Safari also has a Private Browsing Mode, and when activated your browsing history isn’t kept. This would be a good thing to use if you are visiting sites often that you either don’t want others to see or you are visiting banking or other account sites. This way you won’t have to remember to go back and delete your history as it will not be keeping it. To activate this mode, simply go to the Safari menu and click on Private Browsing.
Opera
Opera isn’t used as much as say Safari, Google Chrome or Firefox, but it is used often enough that I felt it would be a good idea to include the steps to clear your internet history on your Mac. So, to clean your internet history in Opera, go to the Tools menu, and then choose Delete Private Data. Once there, all you need to do is click on the triangle by Detailed Options, or click on the Delete button.
If you choose Detailed Options, you will be presented with a list of different things that you can safely delete. You can either use the default choices, or make any changes you like and then click on the Delete button.
You can also clear your browsing history and cache by using the Preferences. To do this click on the Opera section, and then click Preferences, once there click on History. The next window that opens will allow you to clear the history, the cache, and change the settings. Like Safari, Opera also has a Private Browsing option which will automatically delete the history everytime you close the browser window.
Firefox
Firefox and Google Chrome are the most preferred browsers by Mac users. Firefox is especially well liked by programmers, and there are also many sites that will only allow you to use them (most of them are sites requiring some level of extra security) with Firefox. You can have more than one browser, so if you wish to keep Safari and yet also want Firefox you can do so. Just set one as your default.
To delete internet history in Firefox, go to the Firefox menu and choose Preferences. Once there click the Privacy tab. Firefox defaults to Remember History, but to delete the history that it has remembered, simply click on the Clear Your Recent History link.
Once you do that a new window will open, this window will allow you to choose how far back you want to delete the browser’s history. You can choose from one hour or go as far back as the beginning time when you first used the browser. Once you have made your choice, click on the Clear Now button.
If you have opted to have two browsers, it may be difficult to remember to clear the history on both. But, like the other browsers so far mentioned, Firefox also has a Private Browsing option so that your history is not saved. To turn it on simply go to Tools, and click on Start Private Browsing.
If you would prefer, you can also set Firefox to Never Remember History, or you can customize the preferences and settings so that it always clears the cache when you close it down.Â
Google Chrome
Our final browser on our list of how to clean internet history on a Mac is Google Chrome, often just referred to as Chrome. Chrome is one of the, if not the, most used browsers by Mac owners, especially if the user is using GMail as their email provider.

There are two different ways to clean internet history in Google Chrome.
One way is to go to the Chrome menu button (it will be at the top of your screen in the menu / toolbar) and choose Clear Browsing Data. A pop up window will appear giving you the option to delete many different types of cached data. One of the options that is checked by default is Browser History.
Another pop up window will then appear that allows you to select a time frame, which is from one hour to the beginning of time (the first time you used the browser, or the last time you cleaned the history). Most of the time, the default settings are ok to use, all you will need to do is pick the time frame you want to delete and click the button that says Clear Browsing Data.
The second way to clear the internet history in Google Chrome is to use the History menu button. Simply click on it and then choose Show Full History. Once that window opens, click on Edit Items on the right hand side. Then click the Clear Browsing Data button.
Like all the other browsers we have gone through, Google Chrome also has a Private Browsing Mode. To turn it on, click on the File menu, and then select New Incognito Window. While using this window, any websites you visit will not be saved in history.
Final Tips to Keeping Your Internet History in Tip Top Shape
If you are conscious about your internet privacy and security, it is a good idea to clear your history every time you are finished browsing the internet. However, if you don’t wish to use the Private Browsing Mode, or similar features in your browser, make sure to set up a reminder for yourself to clean your internet history at least once every a week.
Clearing your internet history from your browser is also one way to fix your internet browsing if you notice that you are having any issues, such as pages not opening or not loading etc. Often times, internet surfing problems can be fixed in a jiffy is to just clear your history.
Posted: June 14th, 2013 | Author: admin | Filed under: Uncategorized | No Comments »
Have you ever heard someone say Mac’s don’t get viruses? If you have, that’s just not true, Mac’s can get viruses and malware, and sadly many have lost all of their files because they believed the same. That’s why it’s imperative that you have some form of virus cleaner on your Mac computer.
Although you should have an antivirus program running on your Mac, it doesn’t mean that you have to go out and spend a lot of money. Just like there are many good free Windows antivirus programs, there are also many free virus cleaners for Mac’s that work very well. Any one of the six free virus cleaners below will help protect your Mac, so all you need to do is pick the one that has the features you like the best.
Magican Soft
Magican Soft starts out our list of the six best virus cleaners for Macs because it is more than just a free virus cleaner, it’s also a free Mac cleaner, meaning it will clean more than just viruses. While it protects your Mac from trojans, it can also protect it from getting slow or having problems later on by running its cleaning tasks on a routine basis.
When you first download it, you can use it to check for viruses and then use it to clean your Mac everywhere else. Like most cleaners and antivirus apps, you can schedule it to run when you want it to, you can scan and clean individual files, or the entire hard drive, and it will automatically update so you have the latest virus definitions.
One last benefit that I like besides virus cleaning is the fan control. This way you can also protect your Mac from overheating (which my MacBook Pro tends to do a lot). It is compatible with OS X 10.5, to the newest OS X version, Mountain Lion.
Sophos

If you want an antivirus program that provides full protection, including protection from viruses, worms, and trojans, then Sophos will be one you should consider for your Mac. Sophos is compatible with almost all Mac operating systems, including OS X 10.8 Mountain Lion. If you are using Windows on your Mac, you should definitely have an antivirus program on your Mac, and Sophos would be one of the best ones to consider because it is also able to stop threats that are designed for Windows.
Sophos also has a Live Anti-Virus feature that connects you directly to their database to help protect against new viruses. This is really a great free Mac antivirus program. It’s easy to use, and has a lot of options, including scan on access, or on demand, and the ability to set up a scheduled scan that will run at a certain day and time as long as your computer is turned on.
ClamXav
If you just want a simple and free program to protect your Mac from viruses, then the virus cleaner called, ClamXav will work for you. It runs on the open source antivirus engine ClamAV. It is compatible with Mac OS X versions 10.5 and newer, and is available in the Mac App Store. This application is customizable, and you can set it to be active or passive. It can be set to scan selected files, or an entire hard drive, and it also has a Sentry feature to actively monitor your files and hard drive all the time.
Avast
The free antivirus program Avast is a very easy to use and is also very user friendly. It is available for Macs with OS X versions 10.5 and newer. Avast offers three different virus shields, including web, file, and mail shield, and on demand scanning. Avast also has on demand scanning that allows you to decide whether to scan a single file, or the entire system, and the three shields make sure that any incoming files or folders are safe and secure before they have a chance to infect your computer.
Whenever an infected file is detected, an alert message will show on the screen so that you know exactly what is going on at all times. There is also an automatic update feature so that you know you always have the latest version of the software, and the latest virus definitions.
Avira
The fifth Mac virus cleaner that’s free is called, Avira. This antivirus program includes award winning malware detection. Avira is a good program to use that is not invasive and requires very little, if any, attention. All you need to do is install it, and let it run. The makers of Avira have been in the antivirus business since 1986, so using their program means you have the expertise of over 25 years of experience.
This Mac antivirus software will not only find and remove viruses, but also phishing scams, spyware, and other types of malware. This is another virus cleaner that has a scheduler so that you can set a certain day and time for a complete system scan, which is a very good feature because most of us forget to run the scans until we start having issues that we get nervous about.
Comodo
The final of our list of six free virus cleaners is Comodo. Comodo offers protection from viruses, worms, and trojans for OS X based Mac’s. Like most of the other antivirus programs already mentioned, Comodo features an on demand scanner, runs in the background to give you real time protection, allows you to scan single files or folders, or the entire drive, has a built in scheduler and automatically updates so that you always have the latest virus definitions.
Something different from some of the free apps though is that it can also scan compressed files before you unzip them to ensure that they are malware free. Comodo is very easy to install, simple to use, and will help keep your Mac computer free of viruses and malware.


