Posted: June 14th, 2013 | Author: admin | Filed under: Uncategorized | No Comments »
We have all heard of someone who had their computer crash. When this happens the user loses everything, from photos to files. You don’t like to think that it can happen to you, but the truth is it can happen to anyone. What about you though? If your computer crashed, would you lose everything, or have you protected yourself by keeping it backed up? Some may not backup their computer or take other means to keep their files safe because they think it is either too difficult or too time consuming, but it doesn’t have to be either. Saving your Mac files online can eliminate any concern over losing your precious documents.
Saving your Mac files online (also known as ‘the cloud’) is one of the easiest and fastest options now available. With the cloud you can backup and save some or all of your Mac files with the click of your mouse, or easier yet, set it up to have them automatically saved every time you finish with the file or document. Saving your files online also means you have no extra hardware to worry about purchasing or using. If you would like to try out this new way of securing your Mac’s files, you have several options to choose from. Some are free and some are not, but they all do the same thing, which is that they save your files so you do not lose everything if the worst happens.
iCloud
One of the free programs that saves and stores your Mac’s data online is iCloud. This service is built into every new Mac and iOS device so there’s no need to go looking for it to download. You can access any data from any device with iCloud. Set up is easy and you have 5 GB of free storage for you data. One great benefit to using iCloud is that your purchased apps, book, movies, music, and photos do not count as part of the 5 GB storage because of the way iCloud stores them. Another benefit to iCloud is that your data is private and secure because it is protected with the same level of security financial institutions use.
Dropbox for Mac

This is another free storage solution for online file storage, and it’s one of the most popular. You create an account with Dropbox and put the folder on your Mac. You drag files into the folder and you can access them using other computers you have listed with your account. You can also access your account from any browser and download the information in your folder. Once you drop a file into the folder, you can also share it with friends. Many people use this in their business so that they can share files with coworkers. You get 2 GB of storage free with Dropbox and if someone signs up through your account, Dropbox will add more gigabytes of free storage to your account.
IDrive
This online storage option runs as a stand-alone program on your Mac. Adding extra protection, IDrive can now backup Time Machine to your online account. The program has pre and post file transfer encryption and versioning. You get 5 GB storage with the free basic plan. Recovery of your Mac’s files is easy with IDrive.
Data You Can Store with IDrive:
- Applications
- System files
- Preferences
- Accounts
- Music
- Photos
- Documents
- Movies
Carbonite
This online storage for Mac offers several pricing plans. The basic plan has unlimited storage and is $59 a year. With Carbonite you can backup and save all your irreplaceable files automatically. The easy installation has an easy automatic setup function. You click and let the program do the work. Files are backed up automatically as the program runs in the background. Your files are safe in the cloud and encrypted and can be accessed from any computer with internet. You can restore any or all of your files easily and whenever you need them.
Safety Features of Carbonite:
- Bank level security
- Highly secure data centers, guarded around the clock
- Data security details
- Enterprise grade servers
- Personal encryption key management
Norton Online Backup
Norton Online Backup has 25 GB storage and lets you backup and save files from up to 5 computers for $50 a month. The computers can even run on different platforms. It automatically backs up your data to their secure data centers. Your data can be quickly and easily recovered if needed by using a secure web page. It will backup to a connected external hard drive but not to an external hard drive. It provides government grade encryption for your files. You can backup your entire hard drive or just certain files.
Mozy Home

The final option on our list for saving files online is Mozy Home, which like the other programs is easy to use. They offer pricing plans starting at 50 GB for $6 a month or $66 a year. You can schedule your backups for any time during the day or they can be done automatically. There is file encryption during file backup and storage. Mozy Home has bandwidth throttling. You can access your web-based files from anywhere. Mozy also offers Mobile apps for iOS and Android which allows you to save any files, photos or music on your mobile devices just as you would from your home computer.
Final Analysis
There are many advantages to saving your Mac files online. They are:
- Easy recovery if your Mac gets a virus or crashes in some other way.
- Once files are stored with one of these programs they are (depending on the program) easy to share with friends or coworkers.
- If you have some files you need access to but are not near your computer to get them you can access the files from another computer or device.
The programs listed are all easy and quick to use, so you no longer have an excuse for why you are not backing up your Mac or iOS device. There are many great reasons for using ‘the cloud’ to store your Mac’s files, but the best thing about using one of these programs is that you will be prepared if the worst happens and you lose all your data on your Mac. There is really no excuse to chance losing all your Mac’s files now that it can be done with little time and with little or even no expense. If you are using one that we haven’t listed above, please let us know which one you use and what you like about it. It’s always great to hear from our readers and get their input too.
Posted: June 14th, 2013 | Author: admin | Filed under: Uncategorized | No Comments »
There are two main types of cache on your Mac computer, user cache, and of course, browser cache. Most people seem to think that cleaning the cache on a Mac is something that should be done on a regular basis. This is not a good idea though, because although it’s okay to clean up your browser cache, it’s not so okay to do so with your Mac’s system and user caches.
With system and user caches, they should be cleaned as a troubleshooting step when there is a problem, not as a maintenance step to keep your Mac clean. This is because cleaning the system or user cache can sometimes cause problems with the computer. Below you will find some of the the problems that may be happen when you do clean these caches, as well as the steps for cleaning Mac cache or caches if you decide that it is something you should do.
Common Side Effects of Cleaning User Cache
If your Mac is having some issues and you are trying to troubleshoot, then yes, you should clean your Mac’s user cache. However, you should know that there are many potential side effects, including:
- The first restart after cleaning will take longer than usual.
- Many notifications to approve applications will reappear.
- Fonts that have been disabled in Font Book may become re enabled.
- Passwords and form information that the cache has remembered will be lost.
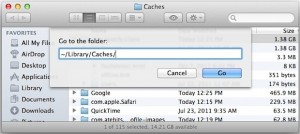
If you do decide that you need to clean your user cache, you can do it by following these steps:
- From the desktop, press Command+Shift+G, this will bring up the ‘Go To Folder’
- Once that is up, type ~/Library/Caches/
- If you are going to delete every cache, delete everything in the folder. (However, this is not usually recommended),
- If you are going to delete specific app caches, search for the application name, and then delete it manually.
- To delete a folder, select it manually, and then press Command+Delete, or manually drag it to the trash.
- Some application caches will have odd names, such as com.AppName.client, so don’t expect everything to show in the list as AppName.
Removing Application Caches to Gain Disk Space
Occasionally you may find that you need to recover some disk space, and removing larger application caches that are not used anymore can help you do this. To find larger application caches and remove them simply do the following:
- In the Caches folder, go to the View menu and click on Show View Options, the shortcut for this is Command+J
- Then click on the checkbox next to Calculate all sizes, you can find this near the bottom of the options menu. Once you have clicked the checkbox, close View Options.
- Look at the folders in list view, and click on Size to sort the folders by their total size.
- Delete any folders that belong to applications you no longer use.
In many cases, even when you uninstall an application, some traces are left behind. This is why manually removing the cache may be a necessary step. Once you have cleaned your Mac’s cache, you should restart your Mac computer.
Clean Mac’s Browser Cache
The browser cache is an area where temporary internet files are stored. Saving these files allows your browser to open web pages that you have already visited much faster. However, it is important that you clear your browser cache occasionally to save space, and to ensure that you are viewing the most up to date version of a website.
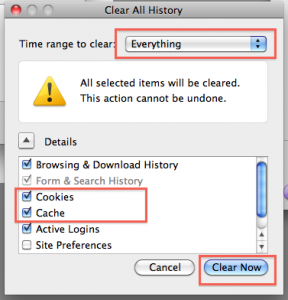
To clear your browser cache, follow these steps below:
- Open your browser, click on the Safari pull down menu and then click Empty Cache. If you do not have Safari, it is still usually easy to find out where to empty your cache or clean your history just by looking through your browser’s menu bar.
- A confirmation box will appear, asking you if you are sure that you want to empty the cache. If you are sure, click on the Empty button.
- Another way to reset your browser cache is to click on Reset Safari from the pull down menu. However, this will also erase all saved information such as passwords and form information.
- Because Safari has no setting to automatically clean the cache when the browser shuts down, (which is an option on many third party browsers). You should remember to clean the cache manually on a regular basis.
Final Tips to a Clean Mac Cache
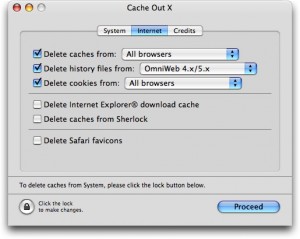
So, now you know when you should clean your Mac’s user cache and when you shouldn’t. Which was outlined as follows: if your Mac computer is running well and not having any problems, there is no need to clean your user cache, and if you do, you may find that you cause problems that weren’t there before. However, if you are finding that your Mac is not running well, and you are experiencing some issues, cleaning your user cache should be a part of your troubleshooting routine.
As for your browser cache though, cleaning it is a good thing to do regularly, but it’s also especially good to do when troubleshooting internet issues you may be having.
It’s also a good idea to delete or empty your browser cache as part of your maintenance routine to help save disk space, and to ensure that you are visiting the most up to date version of any websites.
Posted: June 14th, 2013 | Author: admin | Filed under: Uncategorized | No Comments »
If you do routine maintenance on your Mac to keep it running its best, your maintenance likely includes getting rid of unused files. If you are doing that, then good for you, as it is a recommended part of your Mac’s routine maintenance. But you should know that you may be missing something. That ‘something’ is / are some unused files on your Mac that you can’t see. Getting rid of these unused files on my Mac is important to me during my routine maintenance, and it should be to you too if you want your Mac to continue to run smoothly.
You may think though, that since these files are not seen by you, and since they are no longer used, that they do not matter; but then you’d be wrong. This is because by still being there, these files are taking up valuable disk space and possibly even slowing your Mac down. Not to worry, there are many ways that you can find these unused and unseen files, and also ways to get rid of them for good. Let’s start with how to find the unused files on your Mac.
1. Use Spotlight in OS X
One way to check your Mac for files that are no longer being used is by using something you already have, which is Spotlight. It comes pre installed on OS X. It is fast and simple to use and you can modify your search to easily find the unused files on your Mac. When you open the Spotlight search window, you can set the parameters you want to find your files. You can search by the dates files were opened or when they were last modified. By searching with either parameter you can easily find old files because you can see which files you haven’t been using in a long time.

Ways to Search with Spotlight:
- Type of File
- Date last opened
- Date last modified
- Date created
- File contents
- File name
2. Check Your Mac’s Media Files
Another way you can find your Mac’s unused or old files is by checking your media files. Many times a duplicate file is found that has not been used and is not needed. The duplicate files you have not used can be deleted. It is easy to forget about media files you do not use, so checking these files and getting rid of those you don’t use is a good idea. Make sure to check all media including videos, photos, and music for files you don’t use.
3. Disk Inspector to the Rescue
You may have some big files sitting there on your Mac that have not been used in a long time. One way to find the files that are just taking up space is by using a program that will locate them for you. Disk Inspector is a program you can get at the Mac App Store. When you use Disk Inspector, you will be able to see results as it is scanning. You will have a sunburst type of diagram that will show you the files on your computer. Bigger files will be bigger in the diagram as you watch the visual scan. You can check the files shown in the sunburst diagram by using the Quick Look to get more information on the files. You can then easily locate the unused ones and remove them.
Features of Disk Inspector:
- Animated scan process
- Progress bar during scan
- Displays found files and folders during scan
- Quick Look for files
- Information about files
- Detailed volume information on files
- Display folder structure, skipping free space
- Copy path for items
4. EaseUS Clean Genius
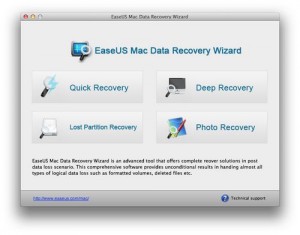
Another program that can help you find those unused files is EaseUs Clean Genius. One of the highlights of EaseUS is that it checks your disk usage and locates unwanted large files that are not used. You have the option of removing the files once they are located. You can also find duplicate files when using EaseUS. When you have duplicate files you can safely get rid of one of them. This easy to use program offers you various ways to free up disk space. It is compatible with Mac OS X 10.6 or higher.
5. Use Grand Perspective
One more app option to help locate those files you have not used is Grand Perspective. This is a small utility application for Mac OS X 10.5 or higher. The program shows a graph like diagram showing you your all of your Mac’s files. Files are shown as rectangles in the graph. Larger files have larger rectangles. Files in a folder will appear together. You can check the files and find the ones that are not used and then get rid of them if you want to do so.
How to Eliminate These Unused Files on Your Mac for Good
One way some of these files were created in the first place was how they were first deleted. By dragging and dropping them to your Trash you are not always getting rid of the file completely. Little bits and pieces, sometimes big bits and pieces, are left behind because your Mac won’t be grabbing all of the file. It just grabs what you see, which may even just be the icon of the app and not the entire program itself. It’s best then to either use the uninstall the app came with, if it came with one or use a program to help you destroy it entirely.
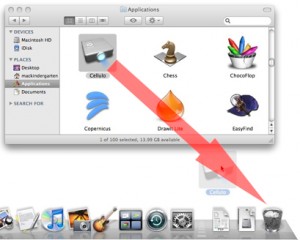
Some programs include AppZapper and MacKeeper. Both have uninstallers that will completely get rid of your unused files on your Mac. AppZapper is free and MacKeeper has a free trial you can use before deciding if you want to purchase it. Either way, before you start deleting files that you’re not sure of what they do, you may want to keep a backup, just in case. Being prepared is always a good idea. Once you empty your Trash or delete them with a program, you can get rid of the backup file if you find that everything is still running fine on your Mac.
Those unused files that are just lurking around taking up space on your Mac will hide from you, until you find them. So the next time you get ready to do your Mac’s routing maintenance, make sure to use some of the above programs or tactics to find your Mac’s unused, unseen, files. This way you really are making sure your Mac will keep running smoothly.
Posted: June 14th, 2013 | Author: admin | Filed under: Uncategorized | No Comments »
Over time your Mac computer may start to get slow when booting up. This can be due to a few things such as: a lot of windows being restored, a long login list, or a very slow external drive that takes a long time to be accessed. Fortunately, these three problems are fairly easy to deal with, and once fixed they will usually speed up your Mac’s startup time. So let’s get started on quickly and easily making your Mac load faster!
Tip 1. Clean Up the Login Item List
Many applications, helpers, and utilities automatically set themselves to run automatically during the login or startup process. In some cases, the processes added to the login items list is something that an application will need, in other cases a login item is added because the application assumes that you want to run it every time your Mac boots up.
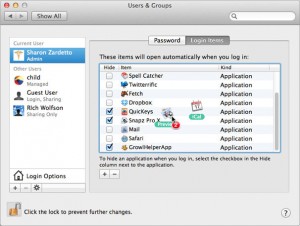
Regardless of the reasons why items are installed this way, if you don’t need them or use them all the time, you can remove them from the login items list to save resources such as CPU cycles and memory.
To View Your Login Items List
- Launch System Preferences. To do this, click on the System Preferences icon in the dock, or select it from the Apple menu.
- Once the System Preferences window is open, click on the Accounts icon.
- Once the Accounts preferences pane opens, choose your account from the list.
- Click on the Login Items tab.
The next thing you will see is a list of items that automatically start every time you boot or login to your Mac.
Which Items Can Be Removed?
The best items to remove are any that belong to applications and utilities that you don’t use or need any longer. Also, if you don’t use an application, you can safely remove any helpers that are associated with it.
Remember however, that removing an item from the Login Items list does not remove the application or utility from your Mac. It simply stops the application from launching when your Mac boots up. The application is still there and can still be used whenever you need it.
How to Remove Login Items
- Select the item in the list by clicking on its name.
- Click on the minus sign (-) in the bottom left corner of the Login Items window.
- The item that you have selected will be deleted from the Login Items list.
Tip 2. Disable Windows &Â App Restore
OS X Lion has the Windows Restore feature built into it, and some people like this feature and find it extremely useful. However, it does slow down the boot time of your Mac considerably. This is because every time your Mac boots the OS has to resume the previous state.
If you decide that you don’t like the Windows Restore feature, or feel that it slows down your Mac’s boot up time too much, it can be disabled quite easily. To do this:
- Open System Preferences and then click on the General section.
- Uncheck the small box that is next to ‘Restore windows when quitting and re-opening apps’.
- Close the System Preferences pane, and restart your Mac.
Tip 3. Disconnect Slow External Devices and Drives
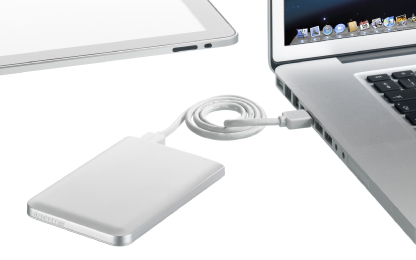
Many external hard drives and other peripherals are very slow, and they have to spin up in order to be accessed every single time you boot your Mac. This can cause your Mac’s boot time to slow down considerably. The easiest and quickest way to solve this issue is to simply disconnect any external drives that you aren’t using, and eject any discs that you don’t need from your Mac. This may be a very simple fix, but it can reduce your boot up time by as much as 15 seconds or more.
Final Tips to a Faster Boot
As you can see, there are at least a few things you can do to speed up your Mac’s startup time that do not involve spending money on hardware upgrades or expensive repairs. In fact, all three of these simple fixes can be done quickly and easily at home by any Mac user. While they may not completely fix slow startup times of an older Mac that may need some hardware upgrades, these tips will speed up the average boot time of most Mac computers quite considerably.
If you do decide that your Mac’s startup time is still too slow, you can purchase a Mac cleaner to clean your Mac’s other areas up, get additional memory or upgrade to an SSD hard drive. Any of these will give your computer a boost to both startup time and general performance and they all are fairly inexpensive, especially if you do it yourself.
Posted: February 9th, 2011 | Author: admin | Filed under: Uncategorized | 1 Comment »
I need to be completely honest – up until about two weeks in the past, I was inside the pretentious group of Mac customers that by no means truly maintained or “spring cleaned†their personal computer. As soon as or twice a year, this would catch up with me and I’d be occasionally fed up with Finder delays and common sluggishness (I blame my nuts tendencies to attempt dozens of new programs on a whim.)
About two weeks back, as suggested by a half dozen of my pals (and also the Mac.AppStorm review), I installed CleanMyMac. The application removed over 25GB value of logs, universal binaries, drivers, multilingual support and caches. The remarkable amount of space I got back, along with the connected pace bump, was outstanding.
Nonetheless, having to pay cash for cleaning providers nonetheless appears very Windows-like to numerous Mac users. If you are not able to install a shareware application, but desire to get a take a look at cleaning out some of the cruft around your Mac, join me following the break to offer OnyX a try!
What’s OnyX?
OnyX can be a properly recognized plan, and has become about since Mac OS ten.2 (Jaguar). When you install the program, you will will need to agree to their “It’s not our fault†agreement, set up the S.M.A.R.T. position bit and confirm the startup volume prior to you start using OnyX.
Smart Verify
Smart Examine
It really is most likely a good thing to confirm your difficult disk in the event you haven’t performed it lately. It is super effortless to complete, either with OnyX or Disk Utility. To do it with out OnyX, just open your Programs folder, come across the Utilities sub-folder and start Disk Utility. Choose your internal drive and click Verify Disk under the First Support tab.
Once you might have OnyX up and operating, you’ll recognize some simple possibilities to get your Mac squeaky clear. We’ll work by way of item by item to ensure you realize what OnyX can do and what people operations will do to your computer.
Verify
If you possess a fairly new Mac, you’ll be able to use a hardware check characteristic to ensure your internal drive is running properly. Referred to as S.M.A.R.T. Statuses, they’re the initial indication that your tough disk could be near failing, and can support prevent you from suffering enormous information loss.
Although it won’t work with external drives, it is crucial to ensure your S.M.A.R.T. status is inside the clear. If you do not need to use OnyX, these statuses might be discovered inside the Disk Utility plan as well.
Verified!
The subsequent sub-tab checks the challenging drive’s Volume Structure. This could be the exact same operate as Disk Utility’s Verify Disk. Should it pop up with a dilemma, you will possibly want to go hunting for the DVD which arrived with your computer, or if you cannot discover it / don’t wish to cope with the problem of repairing it yourself, it is possible to make an appointment at your local Apple Genius bar.
They’ll be happy to repair the drive for you personally, normally at no price. When OnyX does this procedure, it may seem like your pc is frozen. This can be regular. Do not get the “volume requirements to be repaired†message lightly – it most likely does!
The last sub-tab runs through all of the Mac’s Choice Files. These store information that support programs keep in mind their settings – like window layouts, certain person preferences and license keys.
Maintenance
Another mirrored characteristic from Disk Utility, Permissions cleans up any errors within your Mac’s file framework. Permissions usually relate to that has accessibility to your files. For instance, if you have numerous consumer accounts, which programs and possibilities the Regular account holders have in comparison to the Administrators.
Also, permissions are set on the per file basis- so ought to they get out of whack, it could prevent you from opening them. Another way permissions can trigger troubles relates to copying files in between Macs… Both way, it’s an additional important cleaning step to run regularly on your Mac.
To assist restrict how much upkeep the typical Mac person needs to carry out on their Mac, OS X has ‘Scripts’ built to the working method. They are actions that your Mac will run on a daily, weekly or month-to-month foundation.
Normally these scripts run on their own just great – but I’ve noticed situations where they stop working automatically for different factors. OnyX will go ahead and force them all to run if you would really like – and can also show the final time your computer decided to run them.
Scripts
Lastly, the Rebuild tab shows different possibilities you’ve got to repair issues relating to file-program association and distinct indexes. You can clear out the diverse file associations, so that uninstalled, pesky bundled digital camera software will quit attempting to open all of one’s images.
You’ll be able to also reset items like your .DS_Store files which inform your Mac where within the Finder window icons are placed. If your Spotlight search program has been working oddly, you are able to rebuild that, together with the Mail.app’s index of messages. Do not feel the will need to rebuild these unless of course you are actually obtaining problems although.
Cleaning
Here, it is possible to remove all of the diverse cache files which have built up on your system. For example, your web browser frequently merchants media and images in your laptop or computer so going back to them will likely be quicker the next time. This works similarly throughout your Mac.
OnyX has some presets set, which if you are unsure, really should be left as they’re just before operating this method.
Clean Away!
Utilities
Unless you are a energy person, go forward and stay away from this segment of OnyX. It could be a tad bit confusing and is also needless to help your laptop or computer run swiftly.
If you’re interested, these utilities will assist you completely indicate or hide volumes, modify UNIX Manuals, empty the trash securely, and handle Databases stored around your laptop or computer.
Automation
This may be the central point of your application for non-power customers. To go and clean all of the various zones in your Mac, this really is place to go. It’ll allow you empty caches and run the maintenance scripts and programs swiftly and quickly.
Cleaning everything is not going to damage your machine. You are not at a threat of losing data or creating your machine to crash. So, should you feel ambitious or just want to be super thorough- go ahead and verify every thing before pressing Execute.
It’ll take some time for the machine to rebuild caches and indexes, so for any short time it may seem as in case your machine is working slower than prior to. This really is momentary – don’t be concerned!
Setting up an automated method
Creating an automated procedure
Parameters and System Details
OnyX also permits you to set the global settings of many well-known programs in your Mac. These settings include Finder, Safari, iTunes, Quicktime and much more. The Info tab provides the exact same in depth information as the method profiler – just in case you come across a need to brag about your RAM or Video memory dimension. It’ll also allow you to quickly find your serial amount and UUI (Universal Distinctive Identifier) in case AppleCare or your tech help division wants them.
System Preferences and Parameters
Conclusion
Inside the finish, OnyX is really a excellent, free option for cleaning out the cruft that builds up in your laptop or computer from time to time. It really is also an excellent opportunity to determine should you could advantage from other shareware utilities like CleanMyMac or Cocktail – which have less difficult to understand interfaces and more assistance really should you’ve got any questions.
Certainly give OnyX a shot should you feel your Mac is working somewhat to the slow aspect – and allow me know if it can make a distinction!
Posted: February 9th, 2011 | Author: admin | Filed under: Uncategorized | No Comments »
I need to be entirely sincere – up till about two weeks in the past, I was in the pretentious group of Mac customers that by no means really maintained or “spring cleaned†their personal computer. Once or twice a yr, this would catch up with me and I’d be occasionally fed up with Finder delays and general sluggishness (I blame my crazy tendencies to attempt dozens of new apps on a whim.)
About two weeks ago, as recommended by a fifty percent dozen of my friends (as well as the Mac.AppStorm assessment), I installed CleanMyMac. The application removed over 25GB value of logs, universal binaries, drivers, multilingual support and caches. The remarkable amount of room I obtained back again, and also the linked pace bump, was remarkable.
Even so, having to pay cash for cleaning companies nonetheless appears quite Windows-like to many Mac customers. In the event you are not ready to set up a shareware application, but need to take a take a look at cleaning out some of the cruft around your Mac, join me soon after the break to provide OnyX a attempt!
What’s OnyX?
OnyX can be a effectively recognized plan, and has been around because Mac OS 10.2 (Jaguar). When you set up the program, you’ll want to agree to their “It’s not our fault†agreement, set up the S.M.A.R.T. standing bit and confirm the startup volume prior to you begin making use of OnyX.
Wise Examine
Intelligent Check
It is possibly a great thing to confirm your tough disk should you haven’t done it lately. It’s super straightforward to complete, possibly with OnyX or Disk Utility. To complete it with out OnyX, just open your Applications folder, come across the Utilities sub-folder and start Disk Utility. Select your internal drive and click Confirm Disk beneath the Very first Support tab.
Once you might have OnyX up and working, you’ll notice a few basic possibilities to get your Mac squeaky clean. We’ll function by way of merchandise by item to guarantee you know what OnyX can do and what people operations will do to your computer.
Confirm
In the event you have a fairly new Mac, you’ll be able to use a hardware check characteristic to guarantee your internal drive is working well. Known as S.M.A.R.T. Statuses, they’re the 1st signal that your challenging disk might be near failing, and may aid prevent you from suffering substantial data loss.
Although it won’t work with exterior drives, it’s important to make sure your S.M.A.R.T. status is within the clear. In the event you don’t wish to use OnyX, these statuses could be discovered in the Disk Utility plan as well.
Verified!
Verified!
The next sub-tab checks the challenging drive’s Volume Framework. This could be the exact same purpose as Disk Utility’s Confirm Disk. Really should it pop up having a issue, you will either will need to go hunting for the DVD which arrived with your computer, or in case you can’t find it / do not desire to handle the headache of repairing it your self, you can make an appointment at your local Apple Genius bar.
They’ll be happy to repair the drive for you, normally at no price. When OnyX does this method, it may seem like your laptop or computer is frozen. This is regular. Do not get the “volume needs to be repaired†message lightly – it most likely does!
The last sub-tab runs by way of all of the Mac’s Preference Files. These retailer info that help programs remember their settings – like window layouts, specific person preferences and license keys.
Upkeep
Another mirrored function from Disk Utility, Permissions cleans up any errors within your Mac’s file framework. Permissions normally relate to that has entry to your files. For example, should you have several consumer accounts, which programs and possibilities the Common account holders have in contrast towards the Administrators.
Also, permissions are set on a per file basis- so ought to they get out of whack, it could prevent you from opening them. An additional way permissions can trigger problems relates to copying files among Macs… Either way, it is an additional critical cleaning step to run regularly on your Mac.
To assist restrict how much upkeep the common Mac consumer needs to perform on their Mac, OS X has ‘Scripts’ constructed into the operating system. They are actions that your Mac will run on the daily, weekly or monthly basis.
Typically these scripts run on their very own just fine – but I’ve seen situations exactly where they quit functioning instantly for various reasons. OnyX will go forward and force them all to run in case you would love – and will also display the last time your laptop or computer decided to run them.
Scripts
Scripts
Finally, the Rebuild tab shows diverse possibilities you have to repair issues relating to file-program association and diverse indexes. You’ll be able to obvious out the diverse file associations, so that uninstalled, pesky bundled digital digital camera computer software will stop trying to open all of the pictures.
You can also reset issues like your .DS_Store files which inform your Mac exactly where inside the Finder window icons are placed. In case your Spotlight search program has become working oddly, it is possible to rebuild that, along with the Mail.app’s index of messages. Do not really feel the require to rebuild these unless of course you are in fact getting problems even though.
Cleaning
Here, you’ll be able to eliminate all of the distinct cache files that have constructed up in your program. For example, your internet browser typically merchants media and images on your laptop or computer so heading back again to them will probably be faster the subsequent time. This works similarly throughout your Mac.
OnyX has some presets set, which if you are not sure, need to be left as they are before operating this procedure.
Clean Away!
Clean Away!
Utilities
Unless you might be a power user, go ahead and stay away from this part of OnyX. It might be a tad bit confusing and it is unnecessary to assist your computer run speedily.
If you’re interested, these utilities will aid you completely indicate or hide volumes, regulate UNIX Manuals, empty the trash securely, and cope with Databases stored around your computer.
Automation
This could be the central stage with the application for non-power customers. To go and clear all of the distinct zones inside your Mac, this can be place to go. It’ll allow you empty caches and run the maintenance scripts and programs swiftly and quickly.
Cleaning everything is not heading to hurt your machine. You are not at a threat of losing data or creating your machine to crash. So, in the event you really feel ambitious or simply desire to be super thorough- go ahead and test everything prior to pressing Execute.
It will get a while for the machine to rebuild caches and indexes, so for any brief time it may well appear as if your machine is operating slower than just before. This really is momentary – don’t be concerned!
Creating an automated process
Creating an automated method
Parameters and Program Data
OnyX also enables you to set the worldwide settings of numerous common programs in your Mac. These settings contain Finder, Safari, iTunes, Quicktime and more. The Information tab provides the exact same comprehensive data since the method profiler – just in case you come across a need to brag about your RAM or Video clip memory dimension. It will also permit you to speedily locate your serial quantity and UUI (Universal Special Identifier) in case AppleCare or your tech assistance division needs them.
Method Preferences and Parameters
Program Preferences and Parameters
Conclusion
In the finish, OnyX is really a wonderful, free choice for cleaning out the cruft that builds up in your laptop or computer every now and then. It really is also an excellent possibility to see if you could benefit from other shareware utilities like CleanMyMac or Cocktail – which have less complicated to comprehend interfaces and more help should you’ve got any questions.
Absolutely give OnyX a shot in case you believe your Mac is working somewhat on the slow aspect – and allow me know if it helps make a distinction!
Posted: February 9th, 2011 | Author: admin | Filed under: Uncategorized | 2 Comments »
I need to be completely truthful – up until about two weeks back, I was inside the pretentious group of Mac users that by no means actually maintained or “spring cleaned†their pc. As soon as or twice a 12 months, this would catch up with me and I’d be occasionally fed up with Finder delays and basic sluggishness (I blame my ridiculous tendencies to try dozens of new apps on a whim.)
About two weeks back, as suggested by a half dozen of my pals (as well as the Mac.AppStorm critique), I installed CleanMyMac. The application removed more than 25GB worth of logs, universal binaries, drivers, multilingual support and caches. The incredible amount of room I got back, and the connected velocity bump, was remarkable.
Nevertheless, paying funds for cleaning providers nonetheless seems very Windows-like to numerous Mac customers. In the event you are not prepared to set up a shareware application, but wish to take a take a look at cleaning out a few of the cruft around your Mac, join me right after the break to offer OnyX a attempt!
What’s OnyX?
OnyX is really a nicely recognized plan, and has been about since Mac OS 10.two (Jaguar). Whenever you install the plan, you will need to agree to their “It’s not our fault†agreement, install the S.M.A.R.T. position bit and verify the startup volume just before you start using OnyX.
Smart Examine
Intelligent Examine
It is possibly an excellent thing to verify your hard disk if you haven’t carried out it lately. It is super effortless to complete, either with OnyX or Disk Utility. To complete it with out OnyX, just open your Programs folder, discover the Utilities sub-folder and launch Disk Utility. Choose your internal drive and click Verify Disk under the 1st Help tab.
Once you’ve OnyX up and working, you will recognize some easy choices to obtain your Mac squeaky clean. We’ll operate by means of merchandise by item to make sure you know what OnyX can do and what individuals operations will do to your pc.
Confirm
If you have a pretty new Mac, you’ll be able to use a hardware test characteristic to guarantee your internal drive is working effectively. Referred to as S.M.A.R.T. Statuses, they’re the 1st indication that your tough disk could be near failing, and can help prevent you from suffering massive information loss.
Even though it won’t function with exterior drives, it is crucial to ensure your S.M.A.R.T. standing is in the clear. Should you do not want to use OnyX, these statuses might be discovered in the Disk Utility plan too.
Verified!
Verified!
The subsequent sub-tab checks the tough drive’s Volume Construction. This is the same perform as Disk Utility’s Verify Disk. Ought to it pop up having a dilemma, you will both will need to go hunting for your DVD which arrived together with your pc, or if you can’t discover it / do not wish to cope with the trouble of repairing it your self, it is possible to make an appointment at your nearby Apple Genius bar.
They’ll be content to repair the drive for you, typically at no cost. When OnyX does this process, it might seem like your personal computer is frozen. This can be normal. Do not take the “volume wants to become repaired†message lightly – it possibly does!
The final sub-tab runs by way of all of one’s Mac’s Choice Files. These retailer data that assist programs keep in mind their settings – like window layouts, specific consumer preferences and license keys.
Upkeep
Another mirrored characteristic from Disk Utility, Permissions cleans up any mistakes within your Mac’s file structure. Permissions usually relate to that has accessibility to your files. For instance, in case you have several person accounts, which programs and options the Regular account holders have compared to the Administrators.
Also, permissions are set on the per file basis- so need to they get out of whack, it could prevent you from opening them. Another way permissions can cause problems relates to copying files in between Macs… Possibly way, it’s another critical cleaning step to run frequently in your Mac.
To assist restrict how much upkeep the typical Mac person needs to carry out on their Mac, OS X has ‘Scripts’ built in to the operating program. These are actions that your Mac will run on a daily, weekly or month to month basis.
Generally these scripts run on their very own just good – but I’ve noticed circumstances where they quit functioning immediately for numerous reasons. OnyX will go ahead and force them all to run if you would love – and can also display the final time your laptop or computer made the decision to run them.
Scripts
Scripts
Lastly, the Rebuild tab shows diverse choices you’ve to repair issues relating to file-program association and distinct indexes. You can obvious out the different file associations, to ensure that uninstalled, pesky bundled digital camera software will cease trying to open all of one’s pictures.
It is possible to also reset points like your .DS_Store files which tell your Mac exactly where inside the Finder window icons are placed. If your Spotlight search program has been operating oddly, you are able to rebuild that, along with the Mail.app’s index of messages. Do not really feel the will need to rebuild these unless of course you’re actually possessing issues though.
Cleaning
Right here, you are able to eliminate all of the various cache files that have built up in your system. For instance, your web browser typically stores media and pictures in your laptop or computer so heading back again to them will probably be quicker the subsequent time. This works similarly throughout your Mac.
OnyX has some presets set, which if you’re not sure, really should be left as they’re just before working this procedure.
Clean Away!
Clear Away!
Utilities
Unless of course you might be a power user, go ahead and stay away from this section of OnyX. It may be a tad bit complicated and is also needless to support your laptop or computer run quickly.
If you are interested, these utilities will assist you permanently display or hide volumes, regulate UNIX Manuals, empty the trash securely, and handle Databases stored around your personal computer.
Automation
This will be the central point of your application for non-power users. To go and clear all of the distinct zones in your Mac, this can be place to go. It’ll let you empty caches and run the maintenance scripts and programs swiftly and quickly.
Cleaning everything is not heading to hurt your machine. You’re not at a threat of losing information or causing your machine to crash. So, if you really feel ambitious or simply want to be super thorough- go ahead and examine everything before pressing Execute.
It’ll get some time for the machine to rebuild caches and indexes, so for a brief time it might seem as if your machine is working slower than prior to. This is short-term – don’t be concerned!
Creating an automated method
Establishing an automated process
Parameters and System Information
OnyX also permits you to set the world-wide settings of a lot of well-liked programs on your Mac. These settings consist of Finder, Safari, iTunes, Quicktime and far more. The Info tab provides the exact same comprehensive information as the method profiler – just in case you locate a want to brag about your RAM or Video memory dimension. It will also enable you to rapidly find your serial amount and UUI (Universal Special Identifier) in situation AppleCare or your tech assistance division wants them.
Program Preferences and Parameters
Method Preferences and Parameters
Conclusion
In the end, OnyX is a wonderful, free of charge choice for cleaning out the cruft that builds up on your computer every so often. It really is also an excellent chance to determine should you could advantage from other shareware utilities like CleanMyMac or Cocktail – which have simpler to comprehend interfaces and more help should you’ve got any concerns.
Undoubtedly give OnyX a shot should you feel your Mac is operating somewhat to the slow aspect – and allow me know if it helps make a distinction!
Posted: February 9th, 2011 | Author: admin | Filed under: Uncategorized | 1 Comment »
OnyX is really a multifunction utility for Mac OS X. It enables you to confirm the Startup Disk and the construction of its System files, to run miscellaneous jobs of system upkeep, to configure the hidden parameters of the Finder, Dock and of a number of Apple’s own programs, to delete caches, to eliminate a certain number of files and folders that may well become cumbersome and more.
What is New
Edition 2.2.three:
* Misc display bugs corrected
* Deleting the Fonts Cache improved
* Deleting the logs enhanced
* Aid improved and updated
* Person deleting the .DS_Store files within the concealed folders
* Restore Defaults Alternative within the Parameters > Dock panel improved
* Bug corrected although checking the volume in some instances
* Bug corrected in considerably more…
Model 2.2.3:
* Misc display bugs corrected
* Deleting the Fonts Cache improved
* Deleting the logs improved
* Support improved and updated
* Person deleting the .DS_Store files in the concealed folders
* Restore Defaults Choice inside the Parameters > Dock panel enhanced
* Bug corrected even though checking the volume in some instances
* Bug corrected in the Parameters panel (Mac OS X Server)
* Bug corrected when OnyX quit all of the applications
Needs
Intel, Mac OS X 10.six or later on


